
Mixing Drums With Ableton Drum Buss
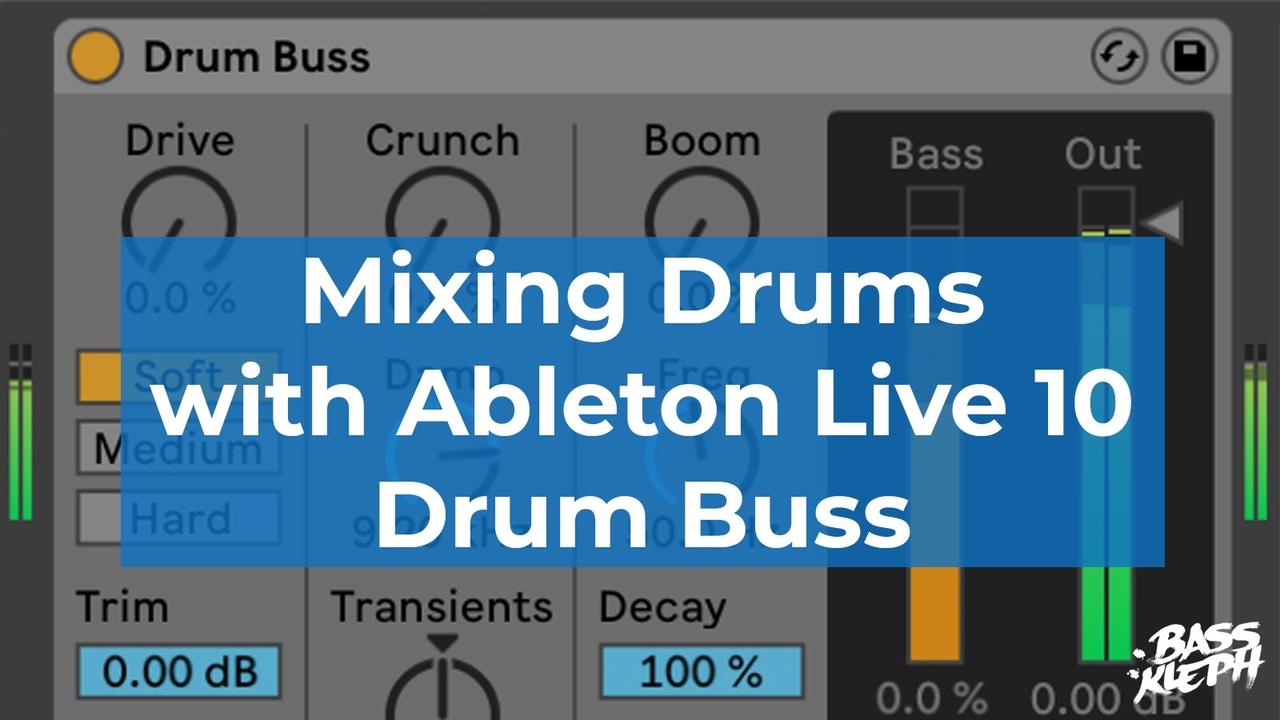
In today's Ableton Live tutorial, we're going to take a look at the Drum Buss plugin. It is one of the new effects that came bundled with Ableton Live 10. This analog-style compressor overdrive and enhancer will give your drums power, energy, glue, and size!
The concept of using compression and overdrive on your drum group is nothing new. In fact, it is something I would do on almost every mixdown. I would usually use a separate compressor and overdrive to achieve this.
Ableton makes this much easier and faster with the new all in one Drum Buss plugin. It is based on compression and overdrive that is pre-optimized for drums and a quick and simple workflow.
As you may assume, the results have been excellent! Check out the walkthrough video lesson, or read on below...
Let's take a look at the three main sections.
Section 1 - The Input Section
Overdrive
Section one begins with a drive control for adding three different types of overdrive.
The soft drive is a waveshaping distortion. The medium drive is a limiting distortion, and the hard one is a clipping distortion with a bit of a low-end boost. You can really feel the low-end boost on the Hard setting.
Compression
The compression part of Drum Buss is optimized for drums and super easy to use. It is merely a single toggle switch for on/off.
You don't get any of the standard compression controls like ratio, and threshold, etc., but you can use the input level to control how hard you drive the compression. Kinda like the old Universal Audio 1176 compressor. i.e., If you lower the trim, you can reduce the compression.
Trim
Even though this compression is simple, you can still achieve some lovely glue and powerful drums. I was impressed with how much could still control it by only using the Trim knob.
Section 2 - Mid To High Section
This section is your mid to high section. It is going to affect things like your snares and claps, all the way up to your high hats and cymbals.
Crunch
This knob increases a unique overdrive that really brings forward the mid-range. It's great for emphasizing your claps and snares, but equally excellent for adding that chunky mid-range weight to your hats, etc. for genres such as House & Techno.
Dampening
This one is kind of like a gentle low-pass filter. We can use it to roll off a bit of top end frequencies and get a darker, dustier sound. You might be surprised that you often don't need your drums to be super bright. Sometimes a little darker can sound larger.
Transient
The final knob in this section is a fun one. It does transient shaping, kind of like an SPL transient designer.
If you turn it to the right, it's going to give the drums a little more punch and attack, plus make them a lot longer and stretched out. If you turn it to the left, it's going to tighten them up. More like a noise gate and note length shortener.
This transient knob can really help dial in exactly the sound you need for your song. It's also fun to automate this in the middle of a song.
Section 3 - The Low-Frequency Section
Boom
The first knob is the Boom knob. This low-end enhancer will add a lot of tasty length, resonance, and ringing to your kick. Kind of like a long tonal 808 note. You won't always want this, but sometimes it's fantastic for big drums!
Frequency
You can use the frequency knob to choose the frequency you want this enhancement to happen at. This tonal ringing is tuned freely, but if you can also set it to an exact keyboard note. Simply get it close, then double click the note icon to lock it exactly on.
Decay
The length of the tonal ringing can be set with the decay knob.
Headphone Button
If you wanted to hear just the effect of what's happening/what's getting added, you can click the little headphone button to listen to it in solo.
Meters
There is a meter to display how much enhancement and compression is getting added, and you have an output level meter and output volume control.
Output Volume
The overdrive and compressor can add quite a bit of volume, so remember to set your output level to be basically the same when you turn the plugin on or off. This is going to help you know if your setting is making the drums better, or if it's just sounding louder. It's very easy to get fooled by this.
Wet/Dry
This control is handy when you want to do a blend of the wet signal and the dry signal. It's like parallel compression, distortion and more. Sometimes it's nice to mix in a bit of dry signal to make it feel not so squashed or overly processed.
The Problem With House Based Music
When producing house based genres (EDM, Techno, Progressive, Deep House, etc.), there's a little bit of a problem. Sometimes having your kick in the same group doesn't work out so well. The kick can put too much pressure on the Drum Buss. It will start to distort easily and stop you from pushing the drive and compression on the other drum sounds like claps and hats.
I personally prefer to take my kick out of the group and process it separately. This way, my main drum group is just things like claps, snares, hats, shakers, cymbals, etc.
For other genres of drums, it can be okay to leave the kick in the same single group. Like Hip-Hop, Trap, Dub Step, Drum & Bass, etc.
Free Download
Grab yourself a FREE download of my own personal Ableton Live 10 Drum Buss presets right here! 😃
AND... Check out the video review for some audio examples of Ableton Live Drum Buss in action.
